
Give each section of your restaurant menu a unique style
When you’re using my Food and Drink Menu plugin, you’ll notice that every menu section is output with the same style by default. In this quick tutorial I’ll show you how to customize the appearance of a section in your menu.
To follow this tutorial, you’ll need to know how to add CSS code to your WordPress theme or child theme. If you’ve never done this before, you can try one of the many WordPress plugins that helps make this easier. I recommend Simple Custom CSS.
Why customize a menu section’s style?
If you’re a restaurant owner or a web developer working for a restaurant, you know that a lot of thought goes into how a menu is designed. One of the most common practices is to draw the diner’s attention to a section of the menu. This is often done by designing this section differently — maybe it is placed in a box, maybe a unique font is used.
But how can we imitate this design practice on the website? Some people try to inline CSS code directly into the content through the WordPress editor. But this is generally frowned upon. If you change themes or design styles down the road, you’ll have to go back through all of your menu items to change them one-by-one. We need a way to write normal CSS rules that target a specific section.
To help with this, Food and Drink Menu wraps every menu section in a class which references its unique ID in the WordPress database.
Each menu section has a unique class you can use to target it with a CSS rule.
Let’s see how it’s done
To demonstrate this, I’m going to make a modification to the two-column menu on my Plate Up theme’s demo. Here’s what the menu looks like before we get started.

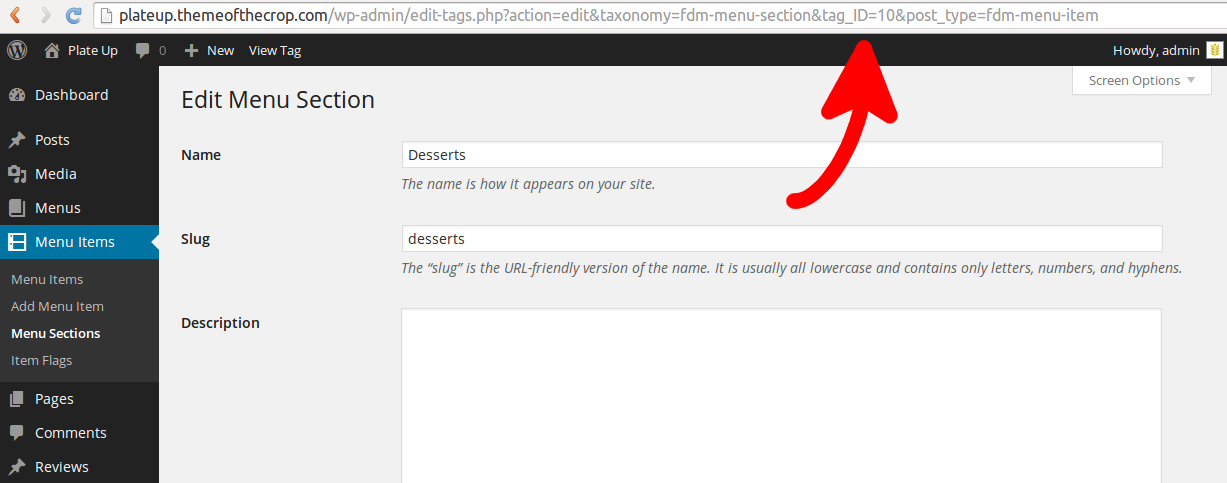
I want to put the Desserts section in a light tan background so that it will stand out. To do that, I first need to know the section’s ID. This is the unique ID that WordPress assigns this section in the database. To find it, open up the Menu Sections page in your WordPress admin panel. Then open the Desserts section for editing.
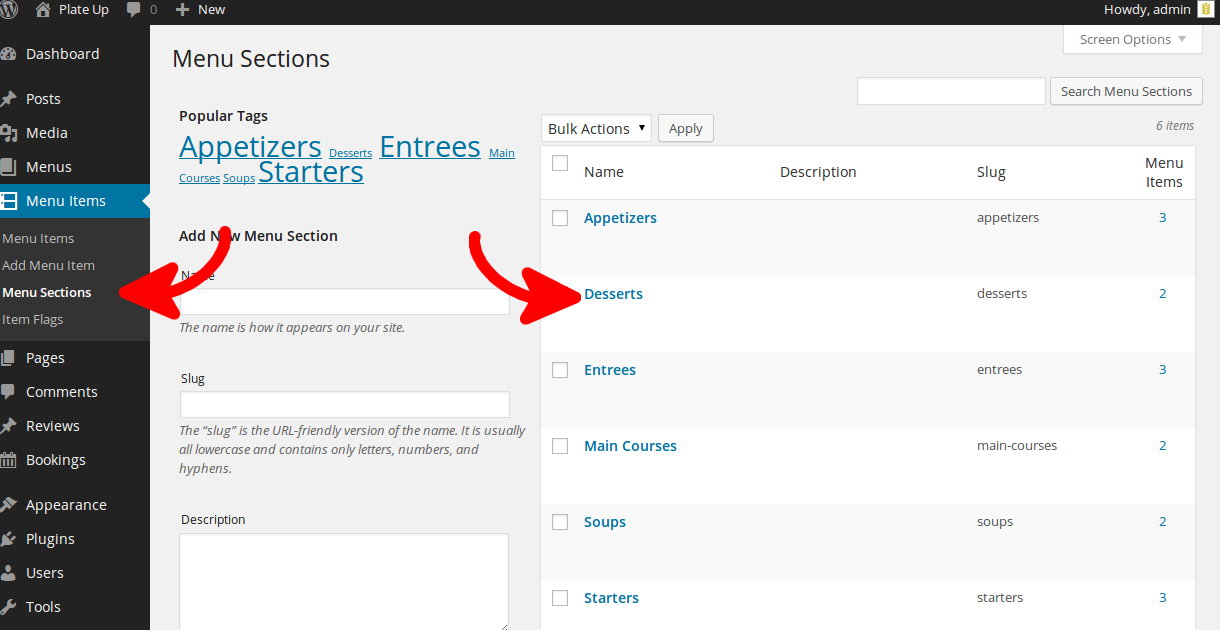
Once the Desserts section is open, look at the current URL in your browser. (This is the long bit of text that starts with http://). Embedded in this URL is a bit of text that will look like “tag_ID=55”. We want to know the number of the tag_ID. In the image below, the number we’re looking for is 10.
Armed with our ID, we can now write some CSS to do what we want. Each menu section in your restaurant menu will be wrapped in HTML code that looks like this:
<ul class="fdm-section fdm-sectionid-10 fdm-section-3">
  <!-- The content of the menu section -->
</ul>
Notice the 10 in there? That’s the unique ID we just found. We’ll use that class, “fdm-sectionid-10”, to write a CSS rule that only applies to that section.
.fdm-sectionid-10 {
  background: #6F6F4F;
  background: rgba(255, 255, 142, 0.2);
}
Make sure you use the ID for your menu section, not 10!
Here we’ve assigned a new background color to the menu section. (Wondering why there are two background calls? The first one is a fallback for older browsers that don’t support transparency.) When we take a look at the menu now, here’s what it looks like.

Alright, we’ve got our background. But the content runs right up to the edge. It doesn’t look great, so let’s add some CSS code to some of the elements within this section to make it look better.
.fdm-sectionid-10 .fdm-section-header {
  padding: 2em 2em 0;
  border: none;
}
.fdm-sectionid-10 .fdm-item {
  padding: 0 2em;
}
Now take a look at it.
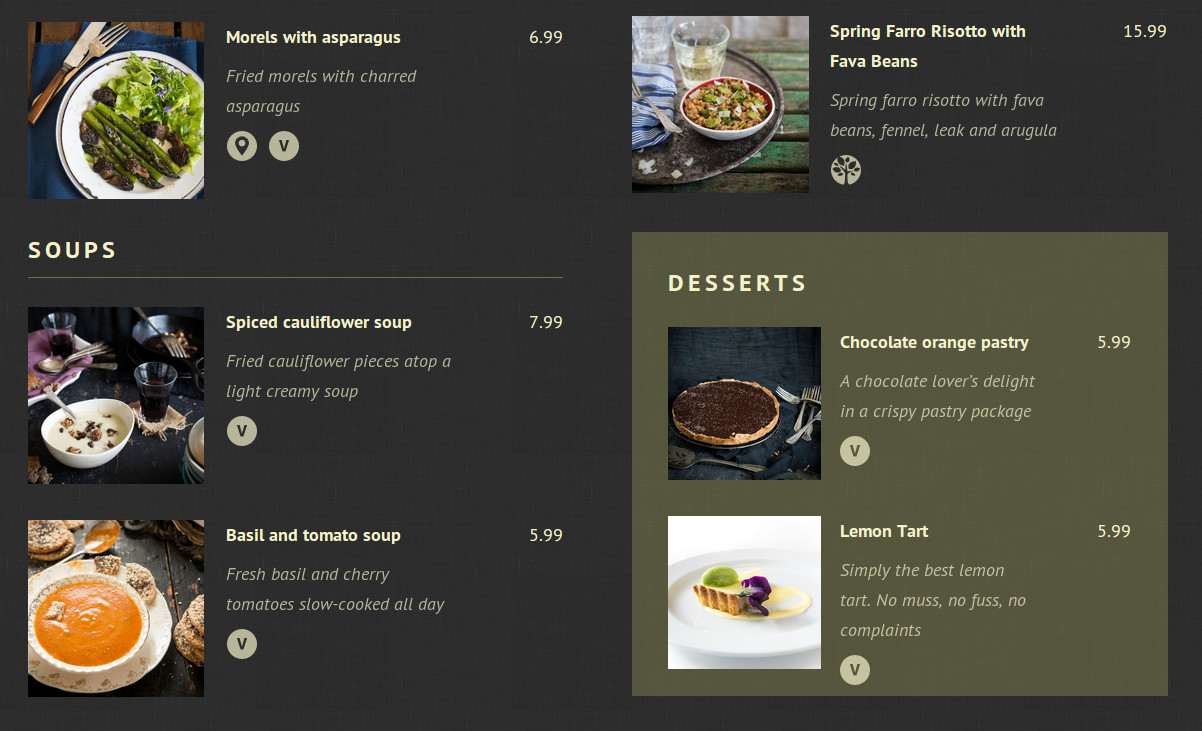
Much better. Using the same technique, you can apply special CSS styles to any of the elements within that section, changing fonts, font size, colors, image size and even the layout of elements. Here are a couple examples to get you started.
/* Make the section title REALLY BIG */
.fdm-sectionid-10 .fdm-section-header h3 {
  font-size: 48px;
}

/* Italicize the title of menu items in the section */
.fdm-sectionid-10 .fdm-item-title {
  font-style: italic;
}
The sky’s the limit
Using this technique, you can do a lot to individualize the sections of your menu. Done anything cool? Let me know.
Sign up for my mailing list if you want to more tips like this or follow Theme of the Crop on Twitter.